Geometry Paint Feature
Mesh AK has a powerful geometry paint feature allowing to change
many aspects of a mesh by a brushstroke. Mesh AK supports tablet
drivers. You may change a mesh by simply clicking on it or painting on
your tablet. Max' reference coordinate systems are also supported; this
allows you for example to sculpt objects in world space (z axis points
to top, which is interesting for sculpting landscapes), local space
(which is more interesting for modeling, where the z axis points along
the normal) or screen space (which is interesting if you want to sculpt
surface details of models).
Important:
To choose painting via normal, set the reference coordinate system to "local", after
clicking the "paint" button. To paint by screen space, set it to "screen".
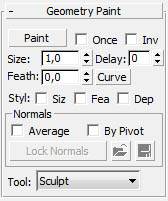
These are the options all Geometry paint tools have in common:
-
Tool:
With the combo box "tool" you select the tool to change the
mesh, e.g. "sculpt" or "select". Detailed descriptions to the various
tools are listed below. Dependent of the selected tool, a new dialog
may appear, with specific options for the selected tool - description
of this see below at the tools section. Not every tool works in every
subobject mode. For example "sculpt" makes no sense in element
subobject mode. In this case the tool is not selectable in this
subobject mode, it doesn't show up in the combo box.
- Paint:
With the "paint" button you switch into paint mode. When you
move the cursor over the mesh now, you will see a 3d-cursor gizmo,
which follows the shape of the mesh. This is the paint cursor. The
"sphere" shows the range of the influence of the cursor. If you have
stylus size pressure enabled, it will also show the strength of the
current brush stroke by its size. The cross will show you the direction
of the brush stroke. the slightly longer line of the cross shows the z
axis direction, into which your brush stroke will work.
- Once:
If checked, one brush stroke will work only once on a brush
stroke. If you move on the same location a second time during the same
brushstroke, nothing will happen.
- Inv:
The check box "inv" inverts your tool. E.g. if have chosen
the tool "select", which selects vertices, faces etc., it will deselect
instead. Shortcut for this checkbox is "M". This checkbox may be
disabled, if the tool doesn't support an inverse mode. E.g. the
deletion tool doesn't support an inverse mode, because the inversion of
delete would be create, and there is no create tool.
- Size:
this shows your cursor size in world units. Shortcuts for
this spinner are "," and "." (on a German keyboard), like in Photoshop.
- Delay:
this sets a delay in milliseconds for painting, if painting is too fast (e.g. Paint scatter paints too many objects too fast)
- Feath:
This allows you to "soften" the edge of the influence. The influence is
smoother, if you set it to 1.0.
- Curve: This brings up
the Paint Falloff Curve dialog, where you can
enter the falloff curve of the brush.
- Styl:
The "Styl" checkboxes represent, if stylus pressure is used
for the values. According to the used tool, some or all of them may be
unuseable ("greyed out"), because they can't be used by the tool. E.g.
a selection tool can't use "depth", because it is useless for this tool
- you can't set the strength of a selection)
- Siz:
The stylus influences the size of the cursor. You see this by the
cursor size in the viewport.
- Fea:
Ths stylus influences the feather range, where a hard pressure means a
hard frame, and softer pressure means a soft frame.
- Depth. The stylus
influences the depth, the strength of the tool.
- Normals Options: These options are only available if the used paint tool supports normals, such as Sculpt and Paint Scatter.
- Average: This sets, how the normal is calculated. If
switched off, each vertex/face/poly is moved by it's own normal. If
switched on, the average normal of each vertex/face/polygon in the
brush stroke is calculated, and the vertex/face/polygon is moved in
this average direction.
- By Pivot: This sets the type of normal. If switched
off, the real vertex/face/poly normal is used. This has the problem,
that the normals constantly change, if they are not locked (see below).
If switched on, not the real normal is used, but a line from the pivot
point through the vertex/face/poly. This has the advantage, that these
"normals" doesn't change, when you paint on the mesh. Additionally, you
can influence the direction by moving the pivot.
- Lock Normals: Locks the normals in their current state.
The normals are frozen in its current state - no matter how much you
paint, they stay the same.
- Save/Load Normals: I have to confess, that this option
is
not very useful. You may save and load the normals of the current mesh,
but loading the normals is only possible into the same mesh, without
any vertex or face changes (adding/deleting verts and faces).
The various tools, "Sculpt", "Select" etc., may require some additional
parameters in some cases. These show up in a separate dialog under the
common options, when you chose the tool by the combo box "tool".